


Measuring Instuctions (Guide Only)
This guide explains the different terms used in garment size guides and shows you how to take your own measurements when choosing your fit.
Please Note: This is a general guide only, please refer to specific sizing instructions for your desired garment in the product descriptions section or style sheet.
If you would like to share feedback about this page, please contact us directly via the link below: Ask us about sizing
Tops
T-Shirts, Shirts, Blouses, Sweaters/Jumpers, Hoodies, Cardigans, Polos, Tunics, Crop Tops, Tank Tops/Singlets, Camisoles, Vests, Tube Tops, Bodysuits, Activewear Tops
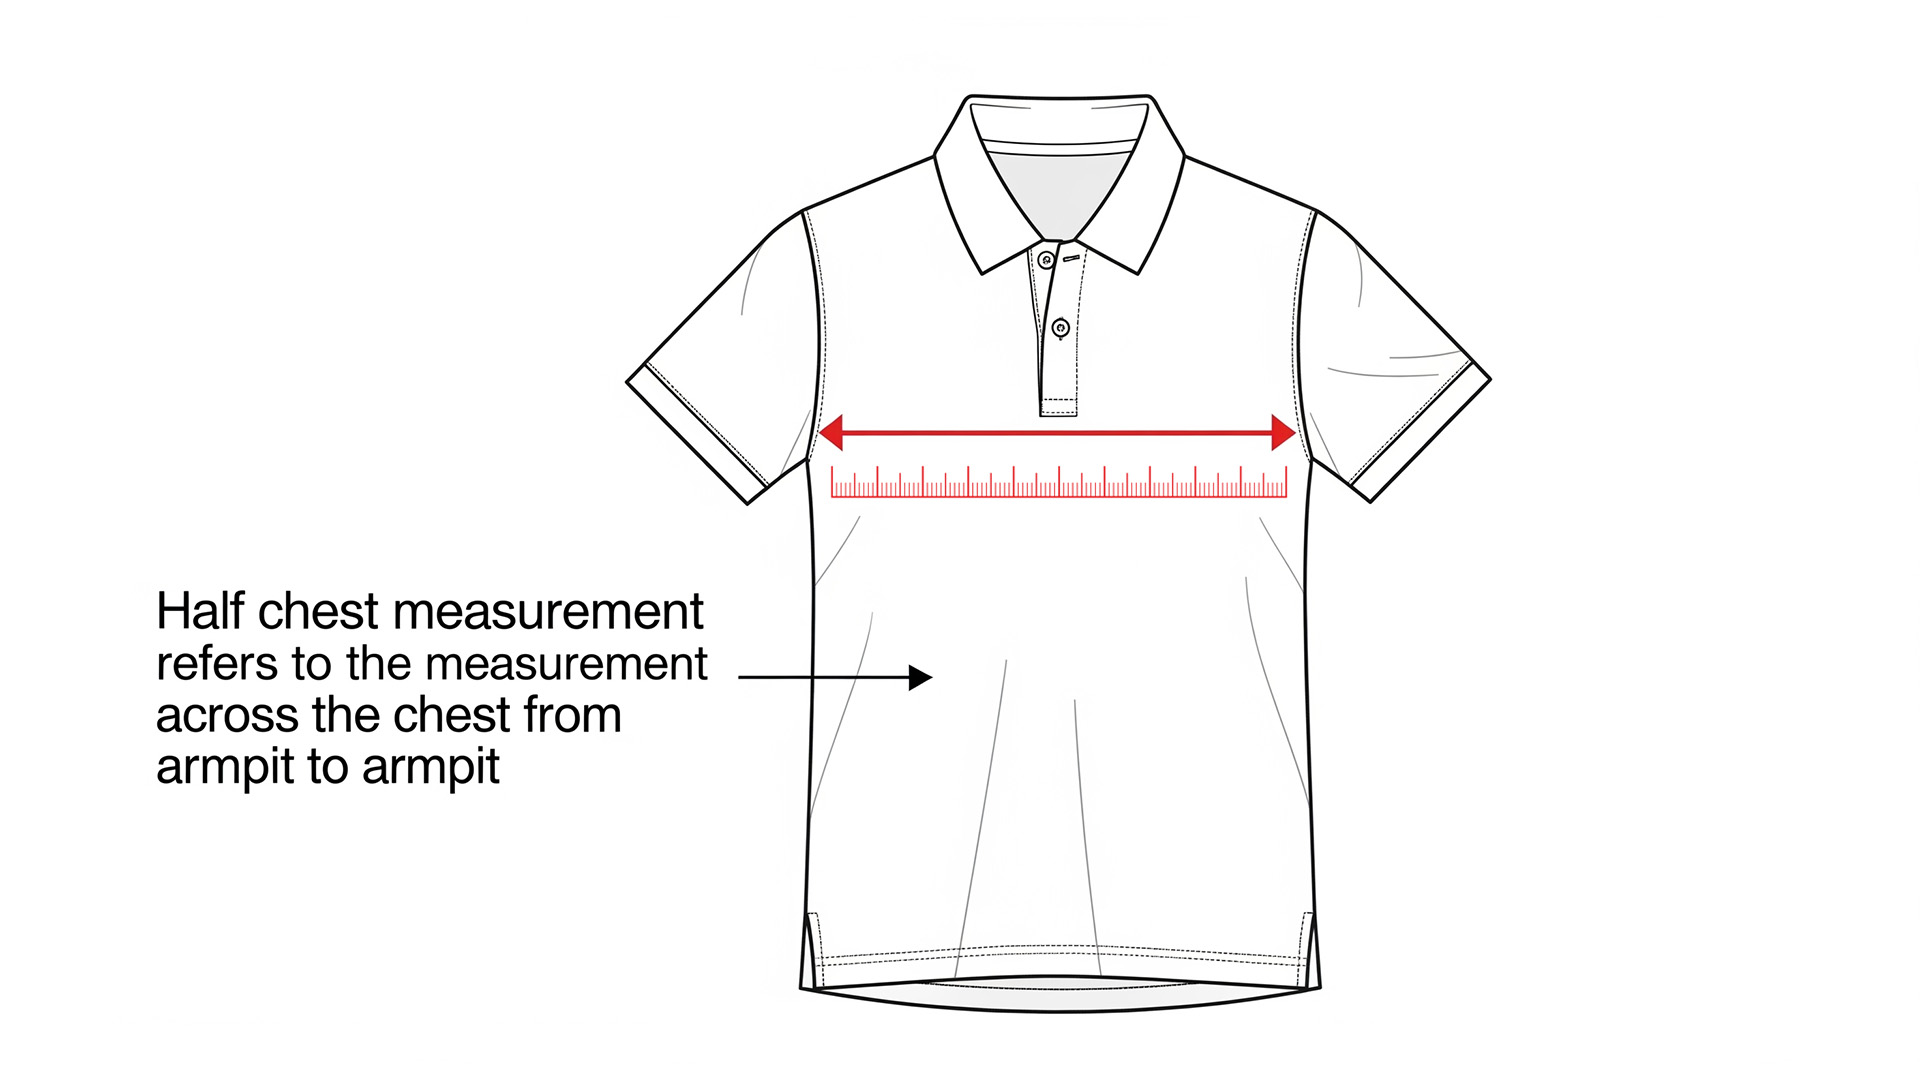
How to Measure Half Chest (Garment Measurement) for tops
The "half chest" measurement is taken directly from the garment itself, not your body. It's a key indicator of how wide a top will be. A top's "half chest" measurement is taken when laid on a flat surface and measured arm pit to arm pit.
What you'll need:
- A top you want to measure (e.g., a t-shirt, shirt, or jumper)
- A measuring tape (cloth or flexible metal)
- A flat surface (e.g., a table or clean floor)
Instructions:
-
Lay the Garment Flat:
- Place the top flat on a clean, hard, and even surface.
- Smooth out any wrinkles or creases, ensuring the front and back layers are perfectly aligned and not bunched up.
-
Locate the Armpit Seams:
- Identify where the sleeve seam meets the main body of the top, directly under the armpit. These are your starting and ending points.
-
Measure Across:
- Take your measuring tape.
- Place one end of the tape precisely at the point where the armpit seam starts on one side of the top.
- Stretch the tape straight across the front of the top, ensuring it remains flat and horizontal.
- Read the measurement at the point where the armpit seam starts on the opposite side.
-
Record the Measurement:
- This figure is your "half chest" measurement.
Half Chest Measurement Diagram
Lowers
Trousers, Pants, Jeans, Shorts, Skirts, Leggings, Jeggings, Capris, Culottes, Track Pants, Cargo Pants, Chinos, Boardshorts, Swim Shorts.
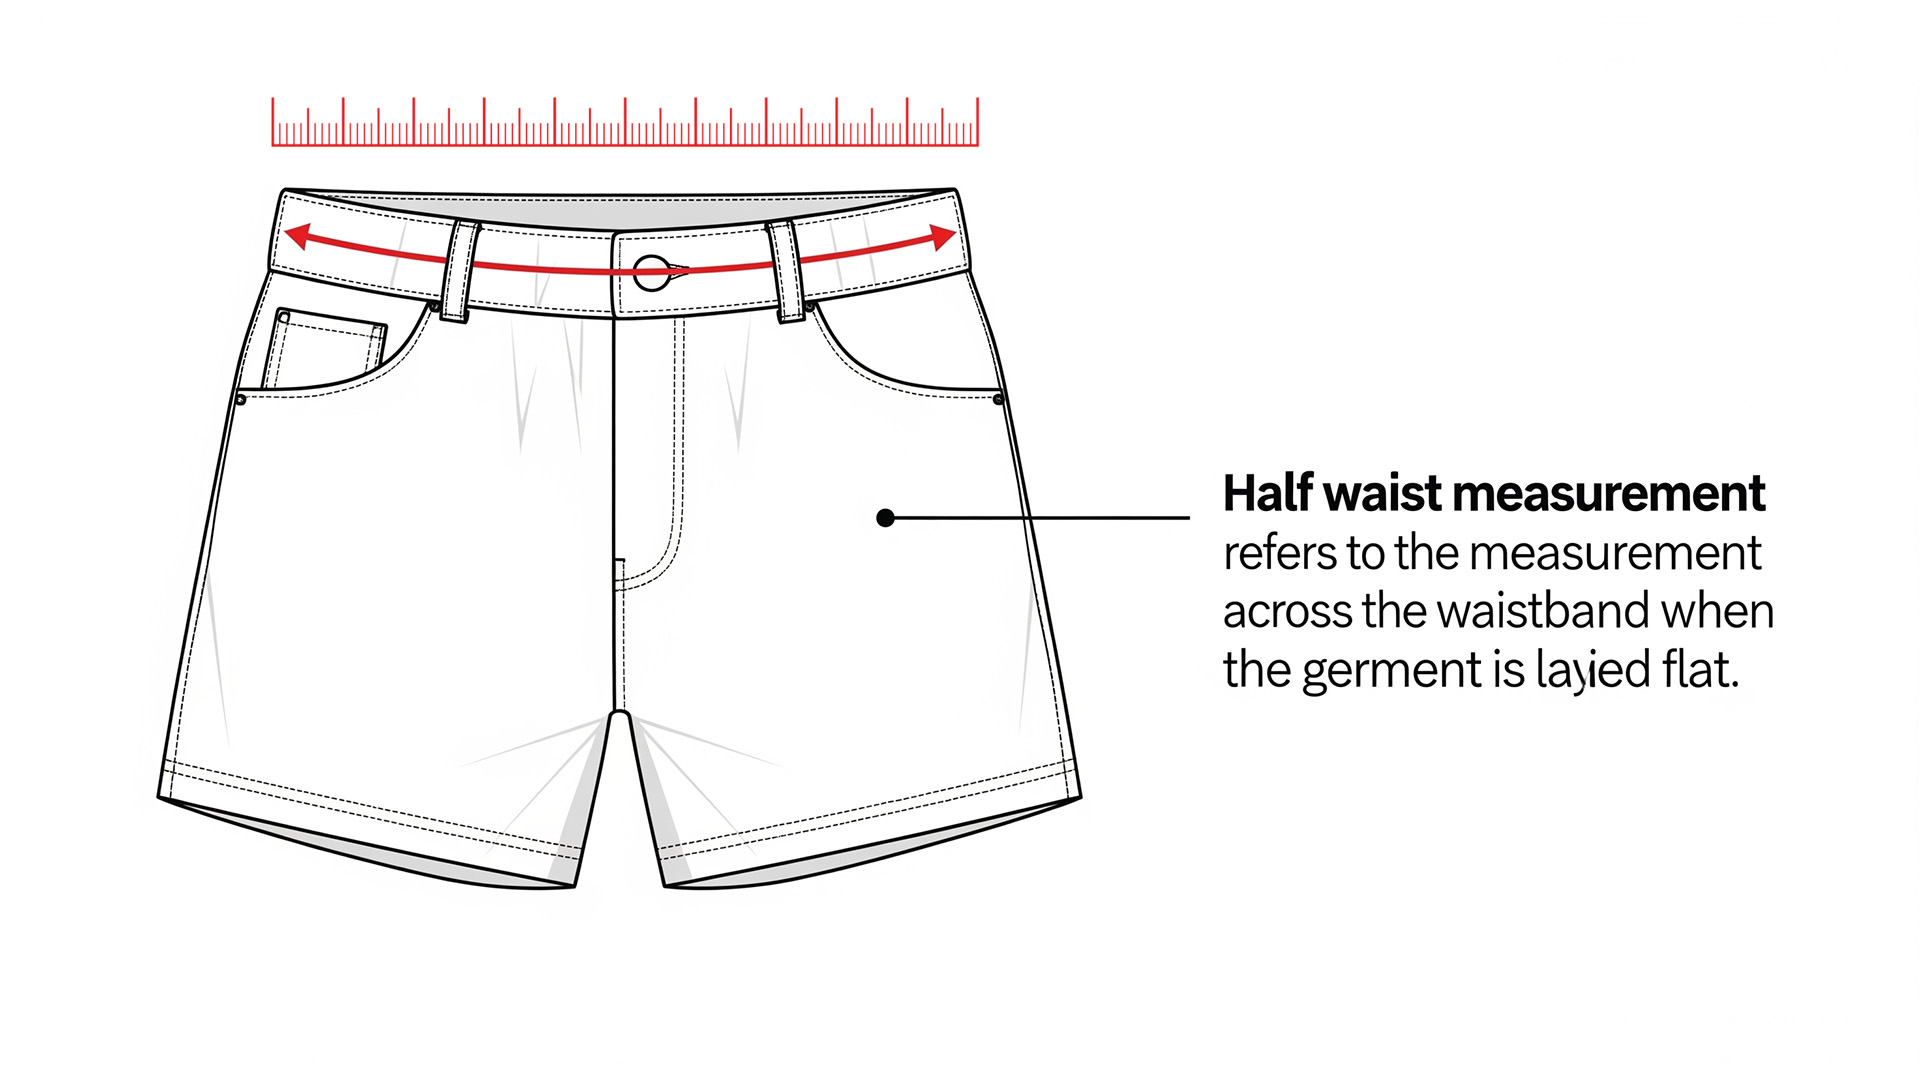
What's a Half Waist Measurement?
Put simply, a half waist measurement is half the circumference of your waist. Instead of measuring all the way around, you're measuring from one side of the waist to the other when the garment is laid flat.
How to Take a Half Waist Measurement (Step-by-Step)
You'll take this measurement on a garment, not on a person. Here's how you do it:
What you'll need:
- A flat surface (a table or clean floor works a treat)
- A measuring tape (cloth or flexible metal)
Steps:
- Grab your Garment: Lay the garment you want to measure (trousers, skirt, shorts, etc.) flat on your clean, smooth surface.
- Smooth it Out: Make sure there are no wrinkles, puckers, or folds in the waistband. You want it as flat and even as possible, just like it would sit when worn.
- Locate the Waistband: Identify the top edge of the waistband. This is the part that would sit around your natural waist or where the garment is designed to sit on your body.
- Align Your Tape: Place one end of your fabric measuring tape at one side of the waistband, right at the outer edge. Make sure it's snug against the fabric but not stretching it.
- Measure Across: Run the measuring tape straight across the very top edge of the waistband to the opposite outer edge.
- Read the Measurement: Take your reading. That's your half waist measurement!
Half Waist Measurement Diagram
Description
Follow these 3 Easy Steps below to Add Embroidery to your order!
*If this is your first time ordering embroidery with Online Workwear, please follow Step 1. accordingly.*
Step 1. Embroidery Set Up: If this is your first time ordering embroidery with Online Workwear, please add Embroidery Set Up to your cart and proceed to Step 2. You can find the Embroidery Setup by clicking on the following link: Embroidery Set Up. If you have already completed Step 1. or you are placing a repeat order you can now proceed to Step 2.
How to upload Logo?
![]()
Step 2. Company Logo/Artwork: It is now time to add embroidered logo/s to your cart. To find this product please click on the following link: EMBROIDERY - Standard Sized Logo. Please choose from the embroidery options provided on this page. Before you add this product to your cart, make sure all the options you have selected are correct and be sure that you have selected an accurate quantity. For example, if you have 5 garments in your cart that you want embroidered, please specify that you want 5x EMBROIDERY - Standard Sized Logo. The price you see on this page is our standard embroidery rate per logo. This rate will be multiplied by the quantity of logos you select. To preview the total cost of your items click on the 'View Cart' at the top right hand corner of this page once you have added your desired items to the cart.
Step 3. Plain Text/Names: If you would like to include embroidered name/s in your order please click and the following link and repeat Step 2: EMBROIDERY - Simple Lettering/Name. Once all of your desired items have been added to the cart. Click 'View Cart' followed by the 'Proceed to Checkout' button to complete your order.
Embroidery Set-up Process for New Logo/s?
Your satisfaction is our top priority. Here is a clear breakdown of the process from artwork submission to final production.
- Artwork Digitisation
Your artwork will be digitised by our in-house embroidery specialists, ensuring it's optimised for our machinery to achieve a high-quality finish. - Digital Mock-up for Approval (See Reference 1. below)
We will email you a digital mock-up of your logo with stitching preview. - Production Scheduling and Dispatch
Once we have your written approval of the sample proof/s, your order will be scheduled for production. This will commence as soon as all garments have arrived at our factory from the supplier/s. - Future Orders
Your digitised embroidery file will be securely stored in our system for future orders, so you won't need to pay the set-up fee again. Minor colour changes can be made free of charge. Please note that if your logo's design changes, a new digitisation set-up fee will apply.
Please Note: Embroidery requires flexibility & understanding with text & logo’s as fabric moves when thread and needle pierce the material, which does cause distortion on lettering & the garments, we do edit to correct the best we can as embroidery won’t always look like a printed version of you logo.
Reference 1. Digital Mock-up for Approval

Why does Online Workwear charge an Embroidery Set-up Fee for new logos?
This is a one-time (per unique logo) Embroidery Set-up Fee that covers the cost of digitising your new logo for our embroidery machines.
Our trained team uses Wilcom EmbroideryStudio e4.5 to convert your digital artwork into .EMB and .DST files, creating a perfect stitch file for your custom garments.
This includes:
- Converting your artwork to embroidery machine files
- Providing digital proof for your email approval
- Making any necessary artwork amendments
Repeat orders using the same logo won't incur this fee. Colour changes to existing files are free.
If you have any questions regarding embroidery set-up, please contact us
Additional Information
Summary: |
A one off charge for New Logos to be set up and saved for future orders. |
15 Reviews
-
Shirt Logo
The process of getting our logo right was very straightforward and quick
-
Was exactly what I was after perfect.
Great service
-
Quality
very perfect embroidery.
-
embroidery set up
very happy with our logo set up, great to be able to order all stock at one place with logo set up
-
logo
Completed as requested and looks great.
-
Fit well
Awesome
-
Logo
So very trilled with this order, I am ordering the same amount this week, I was so happy how these turned out. Many thank for work well done
-
Embroidery
Great Quality
-
Feedback
The choice of colors, the precision of the stitches, and the overall composition exceeded our expectations. Your work has added a touch of professionalism and uniqueness to our apparel, making it stand out among the rest. Thank you for your dedication and talent. We look forward to continuing our collaboration on future projects. Keep up the fantastic work!
Related Products


In-House Decoration
EMBROIDERY - Logo


In-House Decoration