Measuring Instuctions (Guide Only)
This guide explains the different terms used in garment size guides and shows you how to take your own measurements when choosing your fit.
Please Note: This is a general guide only, please refer to specific sizing instructions for your desired garment in the product descriptions section or style sheet.
If you would like to share feedback about this page, please contact us directly via the link below: Ask us about sizing
Tops
T-Shirts, Shirts, Blouses, Sweaters/Jumpers, Hoodies, Cardigans, Polos, Tunics, Crop Tops, Tank Tops/Singlets, Camisoles, Vests, Tube Tops, Bodysuits, Activewear Tops
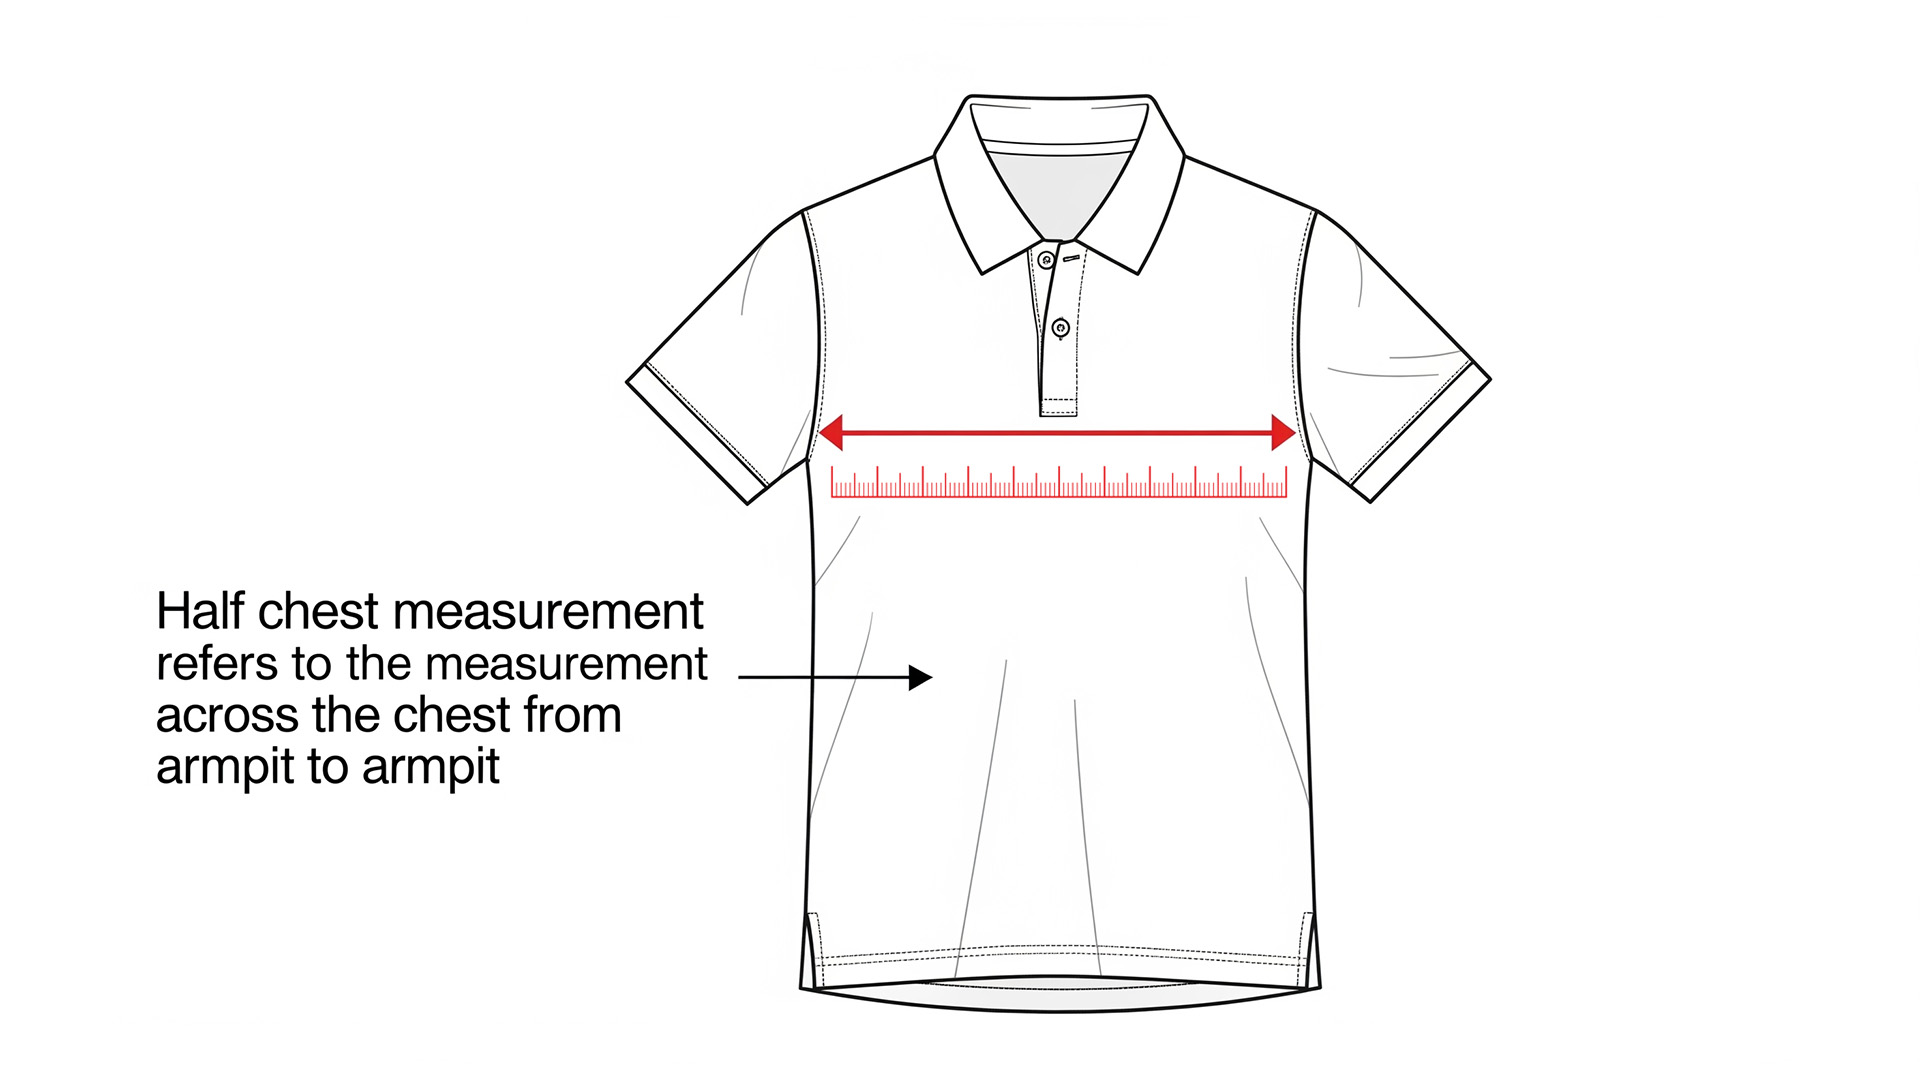
How to Measure Half Chest (Garment Measurement) for tops
The "half chest" measurement is taken directly from the garment itself, not your body. It's a key indicator of how wide a top will be. A top's "half chest" measurement is taken when laid on a flat surface and measured arm pit to arm pit.
What you'll need:
- A top you want to measure (e.g., a t-shirt, shirt, or jumper)
- A measuring tape (cloth or flexible metal)
- A flat surface (e.g., a table or clean floor)
Instructions:
-
Lay the Garment Flat:
- Place the top flat on a clean, hard, and even surface.
- Smooth out any wrinkles or creases, ensuring the front and back layers are perfectly aligned and not bunched up.
-
Locate the Armpit Seams:
- Identify where the sleeve seam meets the main body of the top, directly under the armpit. These are your starting and ending points.
-
Measure Across:
- Take your measuring tape.
- Place one end of the tape precisely at the point where the armpit seam starts on one side of the top.
- Stretch the tape straight across the front of the top, ensuring it remains flat and horizontal.
- Read the measurement at the point where the armpit seam starts on the opposite side.
-
Record the Measurement:
- This figure is your "half chest" measurement.
Half Chest Measurement Diagram
Lowers
Trousers, Pants, Jeans, Shorts, Skirts, Leggings, Jeggings, Capris, Culottes, Track Pants, Cargo Pants, Chinos, Boardshorts, Swim Shorts.
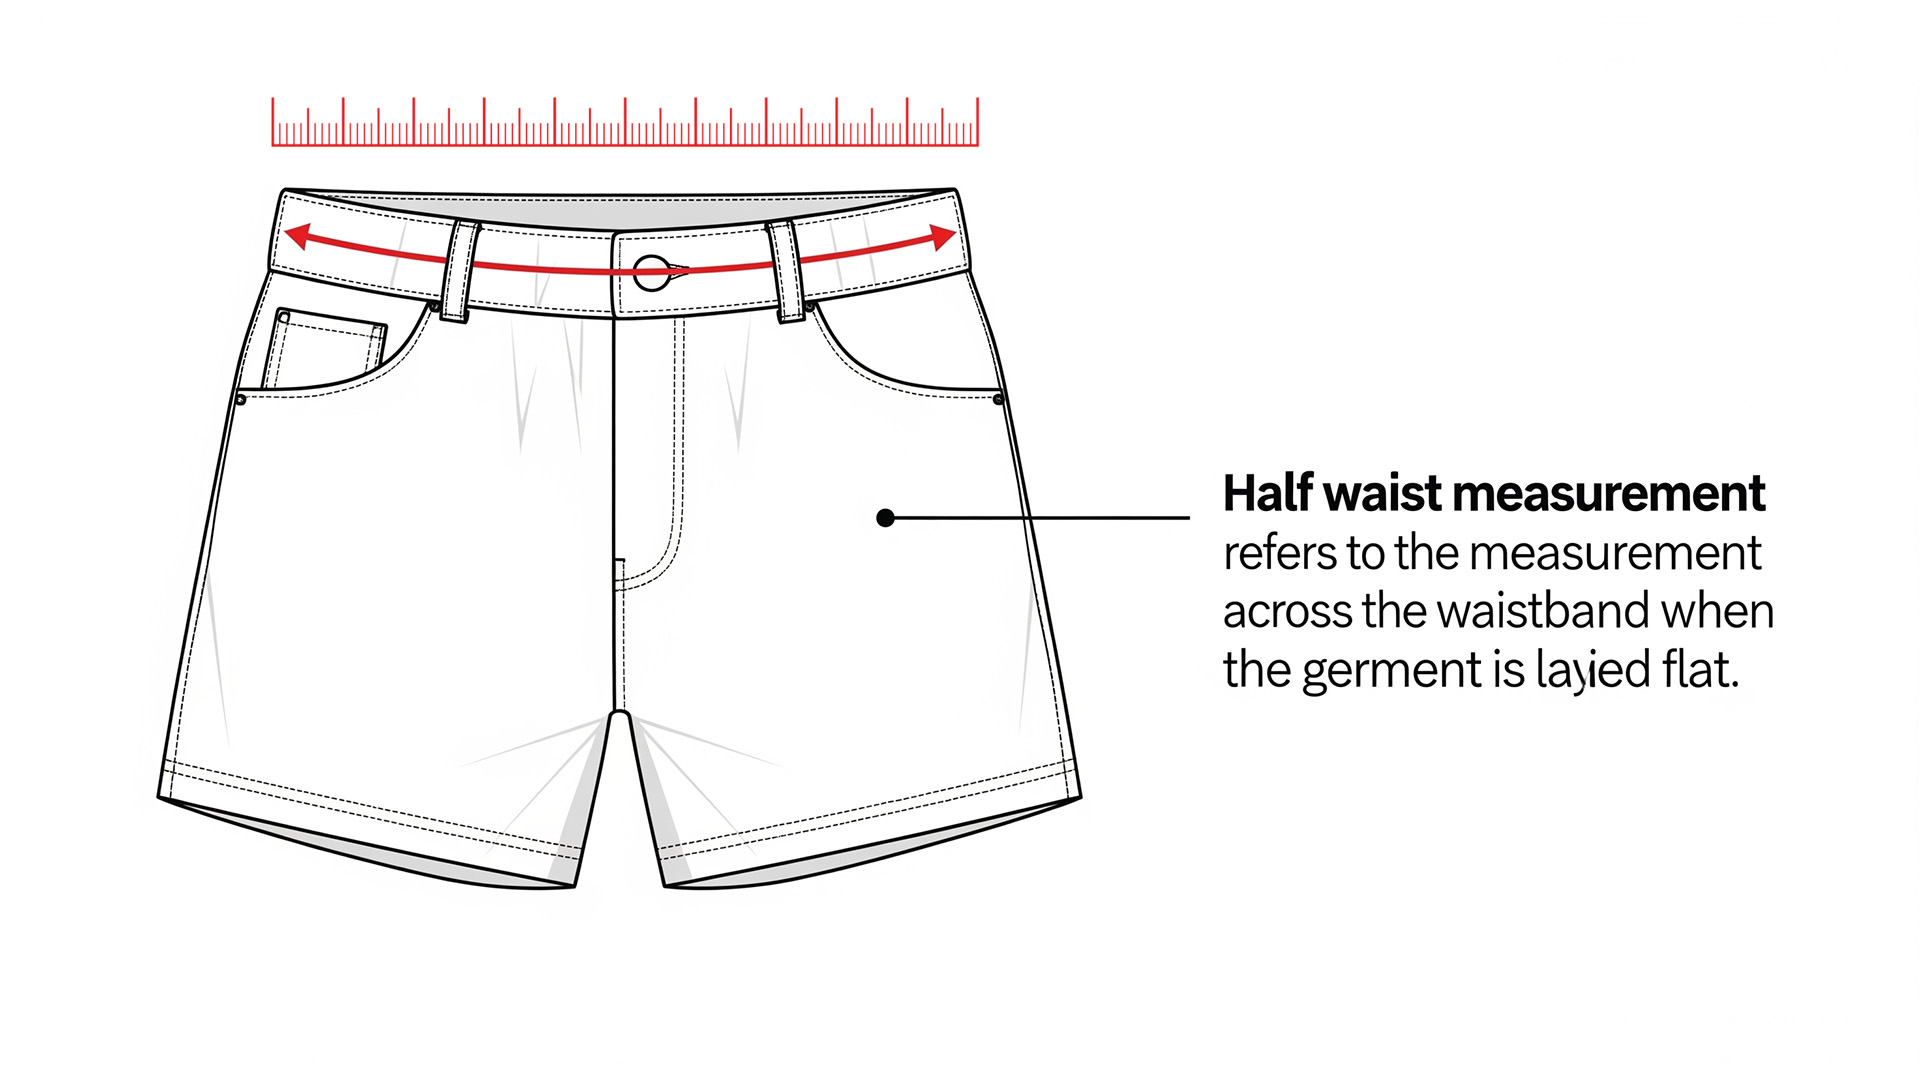
What's a Half Waist Measurement?
Put simply, a half waist measurement is half the circumference of your waist. Instead of measuring all the way around, you're measuring from one side of the waist to the other when the garment is laid flat.
How to Take a Half Waist Measurement (Step-by-Step)
You'll take this measurement on a garment, not on a person. Here's how you do it:
What you'll need:
- A flat surface (a table or clean floor works a treat)
- A measuring tape (cloth or flexible metal)
Steps:
- Grab your Garment: Lay the garment you want to measure (trousers, skirt, shorts, etc.) flat on your clean, smooth surface.
- Smooth it Out: Make sure there are no wrinkles, puckers, or folds in the waistband. You want it as flat and even as possible, just like it would sit when worn.
- Locate the Waistband: Identify the top edge of the waistband. This is the part that would sit around your natural waist or where the garment is designed to sit on your body.
- Align Your Tape: Place one end of your fabric measuring tape at one side of the waistband, right at the outer edge. Make sure it's snug against the fabric but not stretching it.
- Measure Across: Run the measuring tape straight across the very top edge of the waistband to the opposite outer edge.
- Read the Measurement: Take your reading. That's your half waist measurement!
Half Waist Measurement Diagram
Description
Heat Transfers
Choose Heat Transfers for super vibrant colours, clean sharp lines and to preserve the finer details of your artwork.
Features
- 50 - 100+ Washes
- Full colour and Single Colour Designs
- Vibrant colour reproduction
Care & Washing Instructions
- Do not bleach
- Iron inside out
- Cold wash
- Wash garment inside out to extend life of the print (optional)
- Do not tumble dry
Sizing is flexible and our team will prepare a visual mock-up of your artwork for your approval prior to production.
We work with you to find the best layout, position and size when adding your logo or artwork to your order.
Heat Transfers are a great alternative to screen printing for orders with quantities below 24 garments. If you have more than 24 garments in your order and would like a quote for bulk ordering, email our team: orders@onlineworkwear.com.au
If you are interested in our screen printing services and would like more information click here.
How to order
1. Once you have selected a size range for your transfers, choose your desired position.
2. Upload your artwork, preferably a high quality image. We keep your logo on file for repeat orders.
3. Specify the quantity of transfers you require to match the number of garments in your order.
4. Additional notes may be added in the notes section of the checkout if you wish to clarify specific details about your artwork.
What are Heat Transfers?
At Online Workwear we use cutting edge 'Direct to Film' or ‘DTF’ printing technology to produce high-quality, high-fidelity artwork applied to your uniforms or workwear. Direct to Film printing has several advantages over traditional Vinyl Transfers, the DTF printing process supports complicated designs without sacrificing detail, and uses higher quality adhesive for improved durability.
Why Choose Heat Transfers?
- Exceptional Quality: Our high-resolution transfers capture even the finest details of your design, delivering a sharp and clear image that stands out.
- Durability: Designed to withstand the rigors of daily wear, our heat transfers are resilient against washing and wear, ensuring your branding remains intact and looking fresh.
- Versatility: Perfect for various fabric types and colours, heat transfers adapt seamlessly to any apparel, from cotton t-shirts to polyester uniforms.
- Cost-Effective: Ideal for both small and large orders, this method offers excellent value, allowing you to achieve a professional look without breaking the bank.
- Quick Turnaround: Streamlined production processes ensure fast application, getting your branded apparel ready when you need it.

Suggested Products for Digital Vinyl Tranfers:


